Invoice Labels
Last updated: April 10, 2026
Overview
Invoice labels let you create custom, color-coded tags to organize and categorize invoices across your projects. Once enabled, you can assign labels to individual invoices, filter your inbox by label, and set default labels for specific projects.
Labels are managed from the General Settings page by a company admin. After labels are created, any user can assign or remove them on invoices.
Only company admins can enable or disable invoice labels, and create, edit, or delete labels. All other users can view labels and assign or remove them from invoices.
Enabling Invoice Labels
Before you can create or use labels, the feature must be turned on at the company level.
Navigate to Settings → General.
Locate the Invoice Labels section.
Toggle Enable Invoice Labels to on.
Once enabled, the following features become available across the platform:
Feature | Where It Appears |
Label assignment field | On individual invoices in the inbox |
Label filter | Inbox filter bar — filter invoices by one or more labels |
Label badges on invoice list items | Inbox sidebar |
Default Label column | Active Projects settings page |
Labels Management panel | General Settings page, below the toggle |
Disabling the toggle hides all label-related features across the platform, but it does not delete any labels or label assignments you have already created. If you re-enable the toggle, everything will reappear as it was.
Creating a Label
After enabling invoice labels, you can create your first label from the Invoice Labels management panel that appears below the toggle.
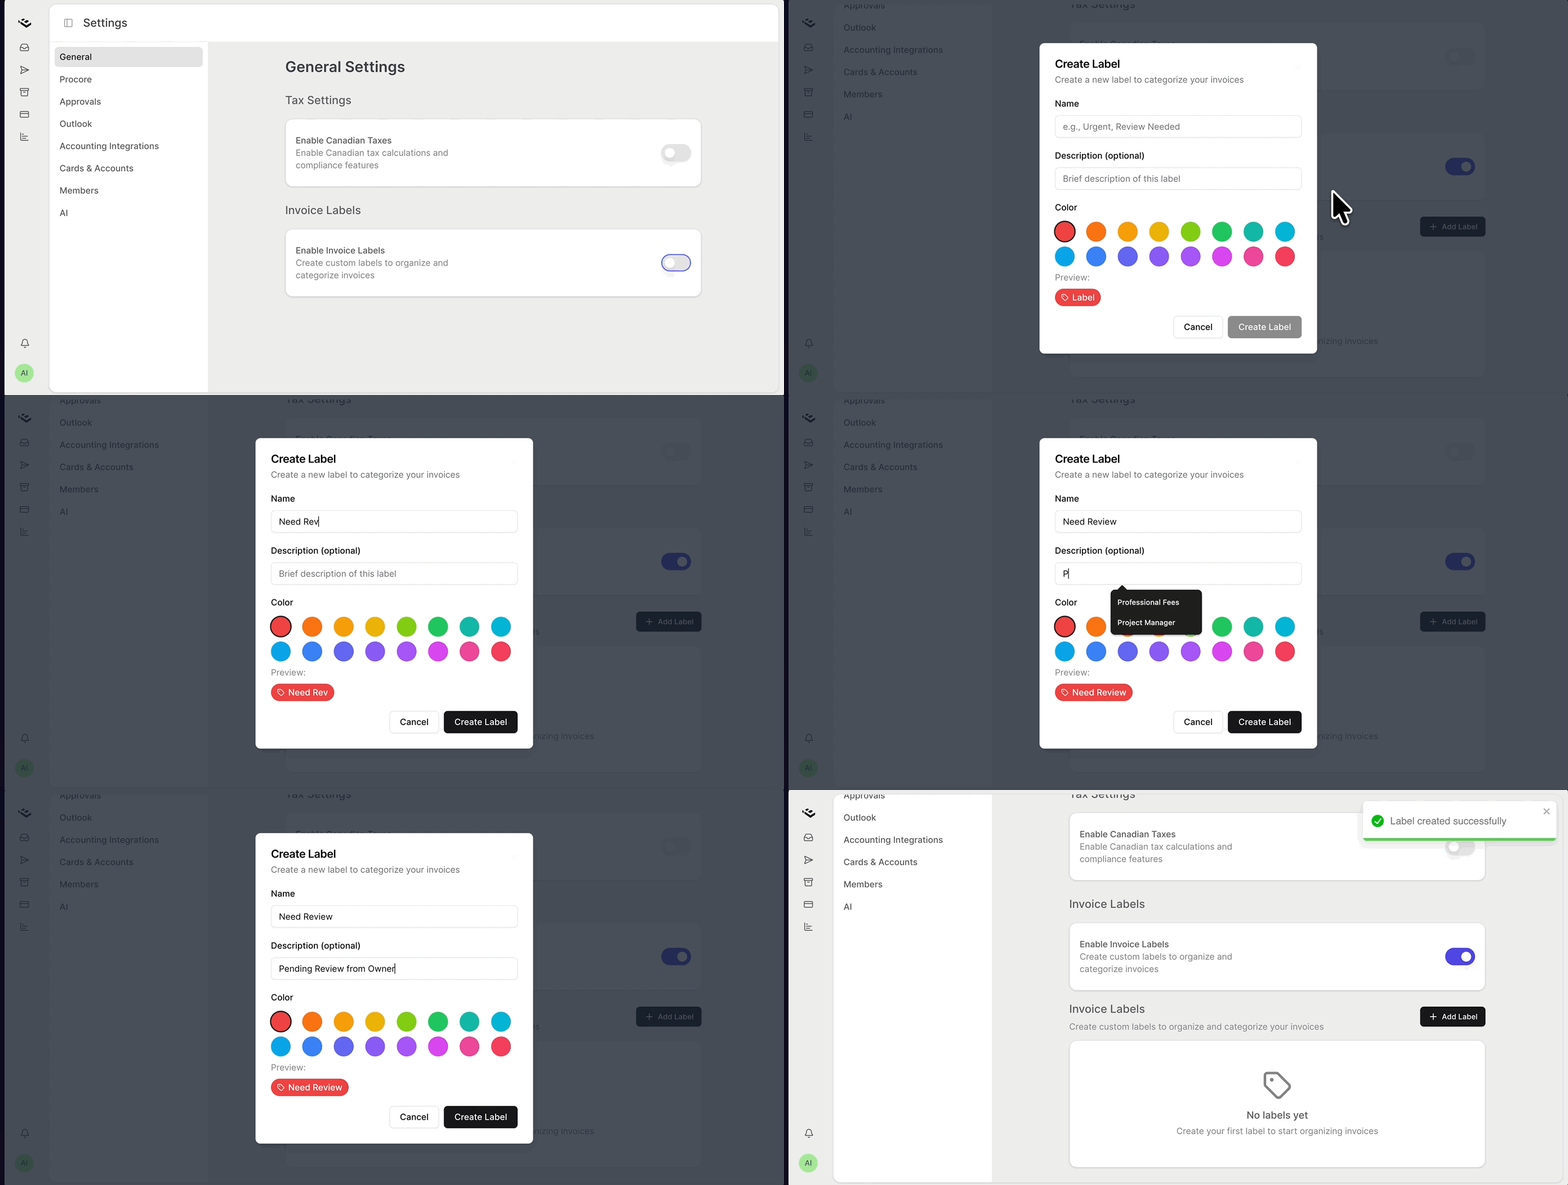
Navigate to Settings → General.
Scroll down to the Invoice Labels management panel.
Click Add Label.
Enter a Name for the label (required, up to 50 characters). For example: "Urgent" or "Review Needed".
Enter a Description if you want to provide additional context (optional, up to 200 characters).
Select a Color from the color grid. A live preview of your label badge appears below the color picker.
Click Create Label.
The new label appears in the labels list and is immediately available for use across the platform.
Available Colors
You can choose from 16 colors when creating or editing a label. The default selection for new labels is Red.
Apply a Label to an Invoice
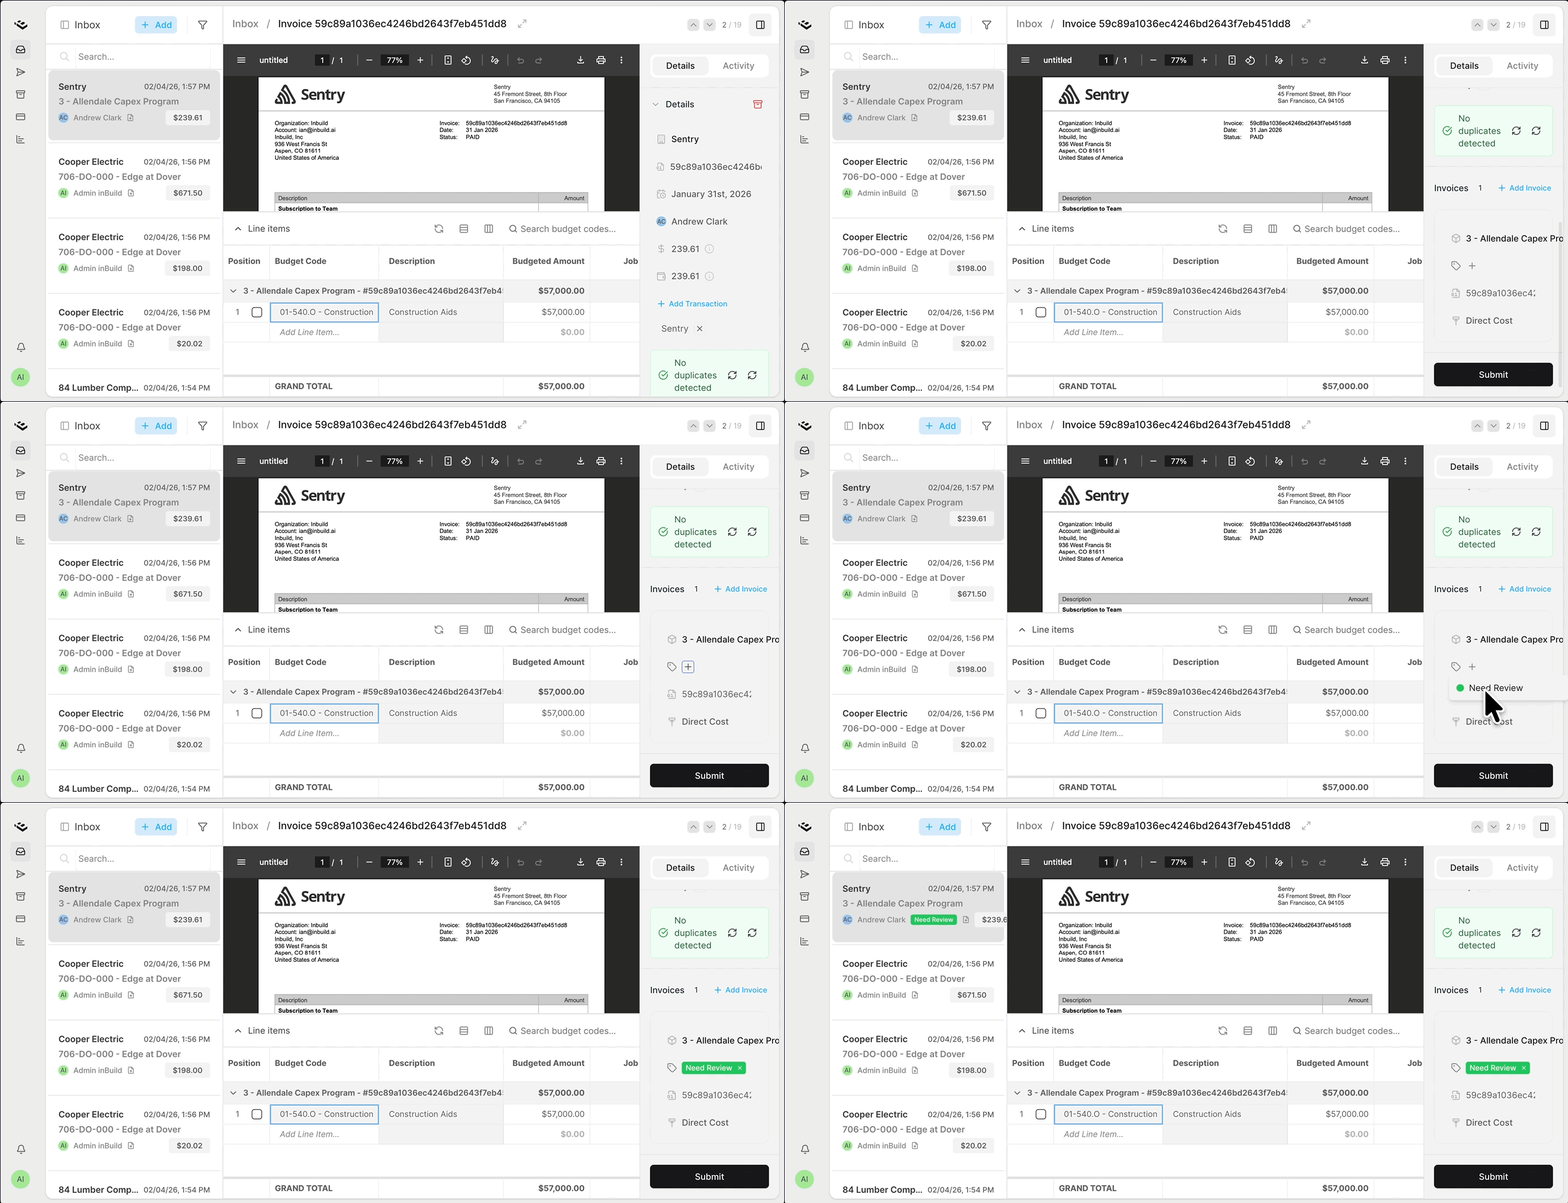
Labels are applied directly from the invoice view.
Open an invoice from your Inbox
In the Invoice Card on the right-hand side
Under the Project selector, click the Label field
Select one or more labels
Once applied, the label will immediately appear on the invoice in the inbox.
Filter Invoices by Label
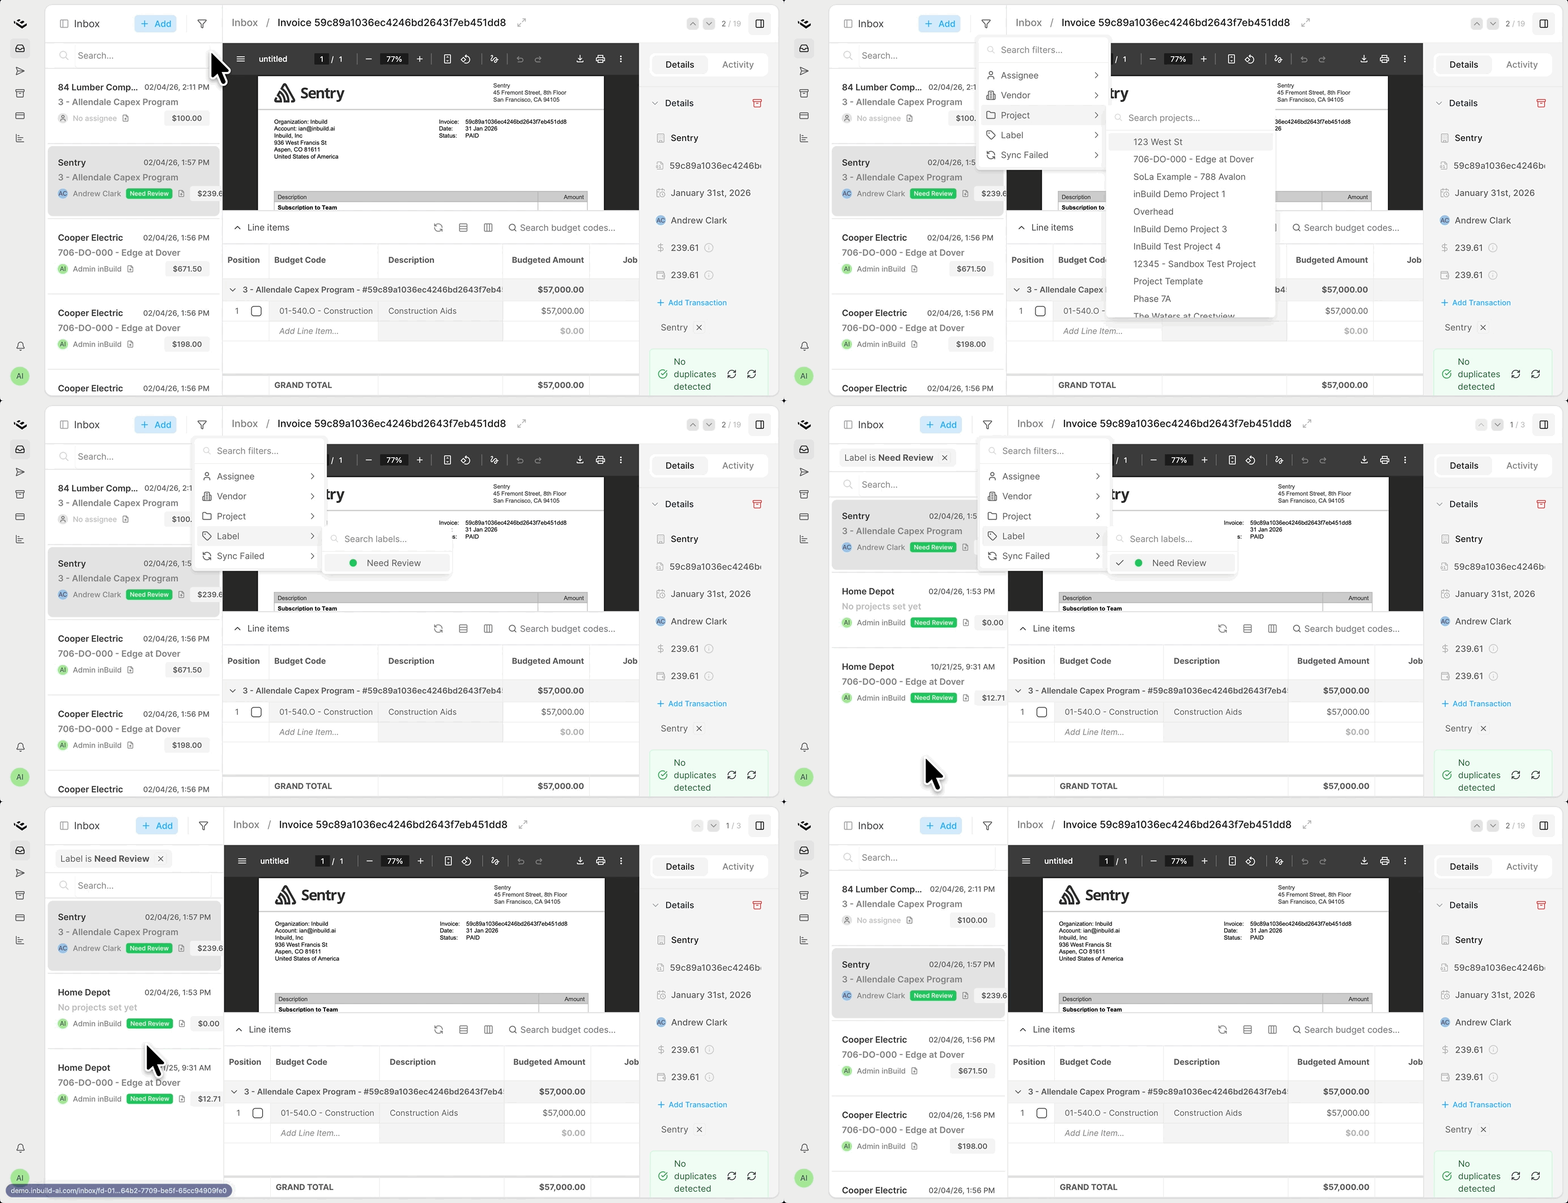
You can quickly narrow down your inbox using labels.
Go to your Inbox
Use the Label Filter
Select one or more labels to filter results
Clear filters at any time to return to all invoices
Editing a Label
You can update a label's name, description, and color at any time. Changes apply immediately across all invoices that use the label.
Navigate to Settings → General.
Scroll down to the Invoice Labels management panel.
Find the label you want to update and click the ⋮ (three-dot menu) button on its row.
Select Edit.
Update the Name, Description, or Color as needed.
Click Save Changes.
Deleting a Label
Deleting a label removes it permanently and unassigns it from all invoices that currently use it.
Navigate to Settings → General.
Scroll down to the Invoice Labels management panel.
Find the label you want to remove and click the ⋮ (three-dot menu) button on its row.
Select Delete.
A confirmation dialog will appear asking: "Are you sure you want to delete the label '[label name]'?"
Click OK to confirm the deletion.
Deleting a label is permanent and cannot be undone. The label will be removed from all invoices it was assigned to.
Setting a Default Label for a Project
When invoice labels are enabled, a Default Label column appears on the Active Projects settings page. Setting a default label for a project means new invoices associated with that project will automatically receive the selected label.
Navigate to Settings → Active Projects.
Locate the Default Label column.
Select a label from the dropdown for the desired project.
The Default Label column is only visible on the Active Projects page when the Enable Invoice Labels toggle is turned on in General Settings.
Permissions Summary
Different actions related to invoice labels require different permission levels.
Action | Who Can Do It |
Enable or disable invoice labels | Company admins only |
Create a label | Company admins only |
Edit a label | Company admins only |
Delete a label | Company admins only |
View labels | All users |
Assign or remove a label on an invoice | All users |
Filter invoices by label | All users |
Frequently Asked Questions
What happens to my labels if I disable the Enable Invoice Labels toggle?
Disabling the toggle hides all label-related features across the platform, but your labels and their assignments to invoices are preserved. If you re-enable the toggle later, all labels and assignments will reappear exactly as they were.
Is there a limit to how many labels I can create?
There is no set limit on the number of labels you can create. You can add as many as you need to organize your invoices effectively.
Can I assign more than one label to an invoice?
Yes. You can apply multiple labels to a single invoice.
I don't see the Add Label button or the three-dot menu on labels. Why?
The Add Label button and the ⋮ menu (for editing and deleting) are only visible to company admins. If you don't see these options, check with your company admin to have labels created or updated.
If I delete a label, what happens to invoices that had it assigned?
When a label is deleted, it is permanently removed from all invoices it was assigned to. The invoices themselves are not affected — they remain in your inbox as normal, but will no longer display the deleted label.
I changed a label's color and name. Did that update everywhere?
Yes. When you edit a label, the changes take effect immediately across the entire platform — including on all invoices that already have the label assigned, in inbox filters, and in the inbox sidebar.