Mapping Procore Data to QuickBooks
Last updated: April 13, 2026
Overview
After you connect a QuickBooks Online or QuickBooks Desktop integration and complete the Setup Wizard, you need to map your Procore data to the corresponding records in QuickBooks. Mapping ensures that when invoices, commitments, and other financial data sync from Procore to QuickBooks, each record lands in the correct account, is assigned to the right vendor, and is associated with the right customer or project.
inBuild provides three mapping tables for each integration: Line Items, Projects, and Vendors. You can access these from the Data Mapping Tables section on your QuickBooks settings page. Each mapping table lets you link a Procore record to its QuickBooks counterpart so synced data flows to the right place.
You must complete the Setup Wizard before the mapping tables become available. If you have not yet run the wizard, a message reading "Configuration Required" will appear in place of the mapping links.
Accessing the Data Mapping Tables
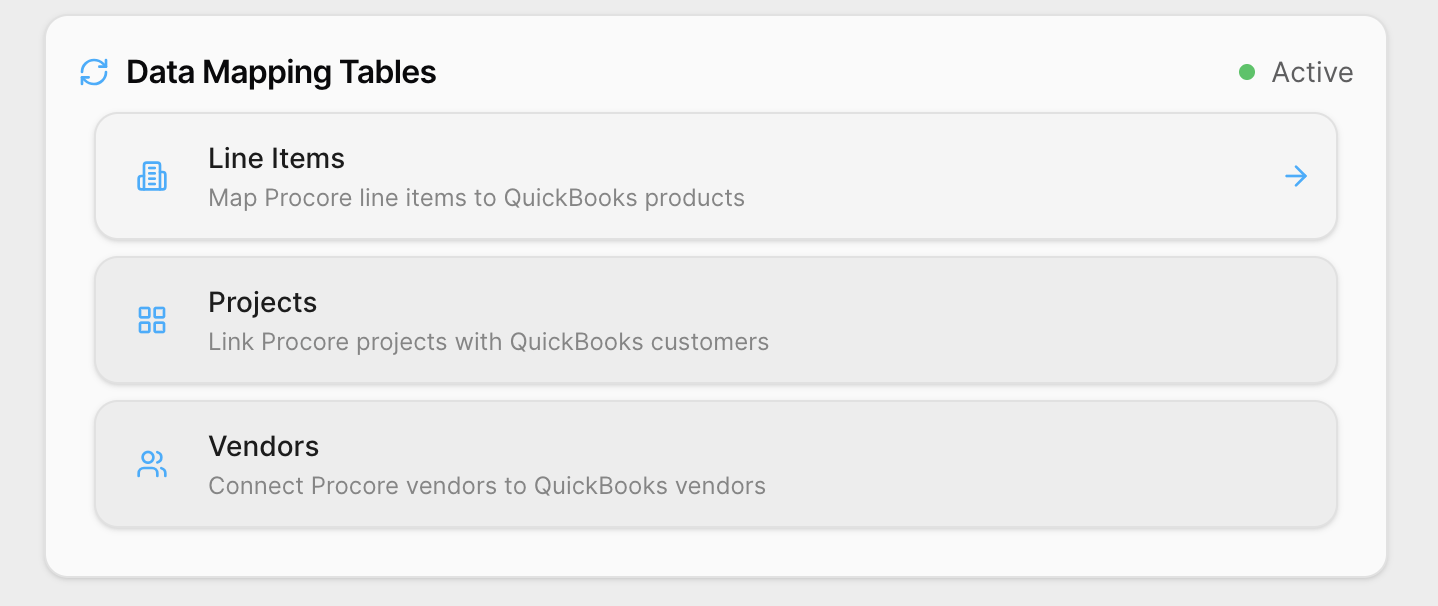
The mapping tables are located on the settings page for each integration. Follow the steps below to reach them.
QuickBooks Online
Navigate to Settings in the left sidebar.
Click Accounting Integrations.
On the QuickBooks Online integration card, click Settings.
Scroll down to the Data Mapping Tables section. You will see three cards: Line Items, Projects, and Vendors.
Click the card for the mapping you want to configure.
QuickBooks Desktop
Navigate to Settings in the left sidebar.
Click Accounting Integrations.
In the QuickBooks Desktop integration list, locate the integration you want to configure and click Settings.
Scroll down to the Data Mapping Tables section. You will see three cards: Line Items, Projects, and Vendors.
Click the card for the mapping you want to configure.
Only users with the Procore Company Admin role can view and modify mapping tables. If you do not see the Accounting Integrations link in the Settings sidebar, confirm that you have admin access.
Understanding the Three Mapping Tables
Each mapping table connects one type of Procore record to its QuickBooks equivalent. The table below summarizes what each mapping does and where it appears in QuickBooks.
Mapping Table | Procore Record | QuickBooks Record | Purpose |
Line Items | Cost codes and/or cost types | Products/Services (item-based) or Expense Accounts (account-based) | Determines which QuickBooks line item or account is used for each cost code when a bill or invoice syncs. |
Projects | Procore projects | QuickBooks Customers, Projects, or both | Links each Procore project to a QuickBooks customer or project so synced transactions are categorized correctly. |
Vendors | Procore vendors (subcontractors and suppliers) | QuickBooks vendors | Ensures that bills and payments are attributed to the correct vendor in QuickBooks. |
Line Item Mapping
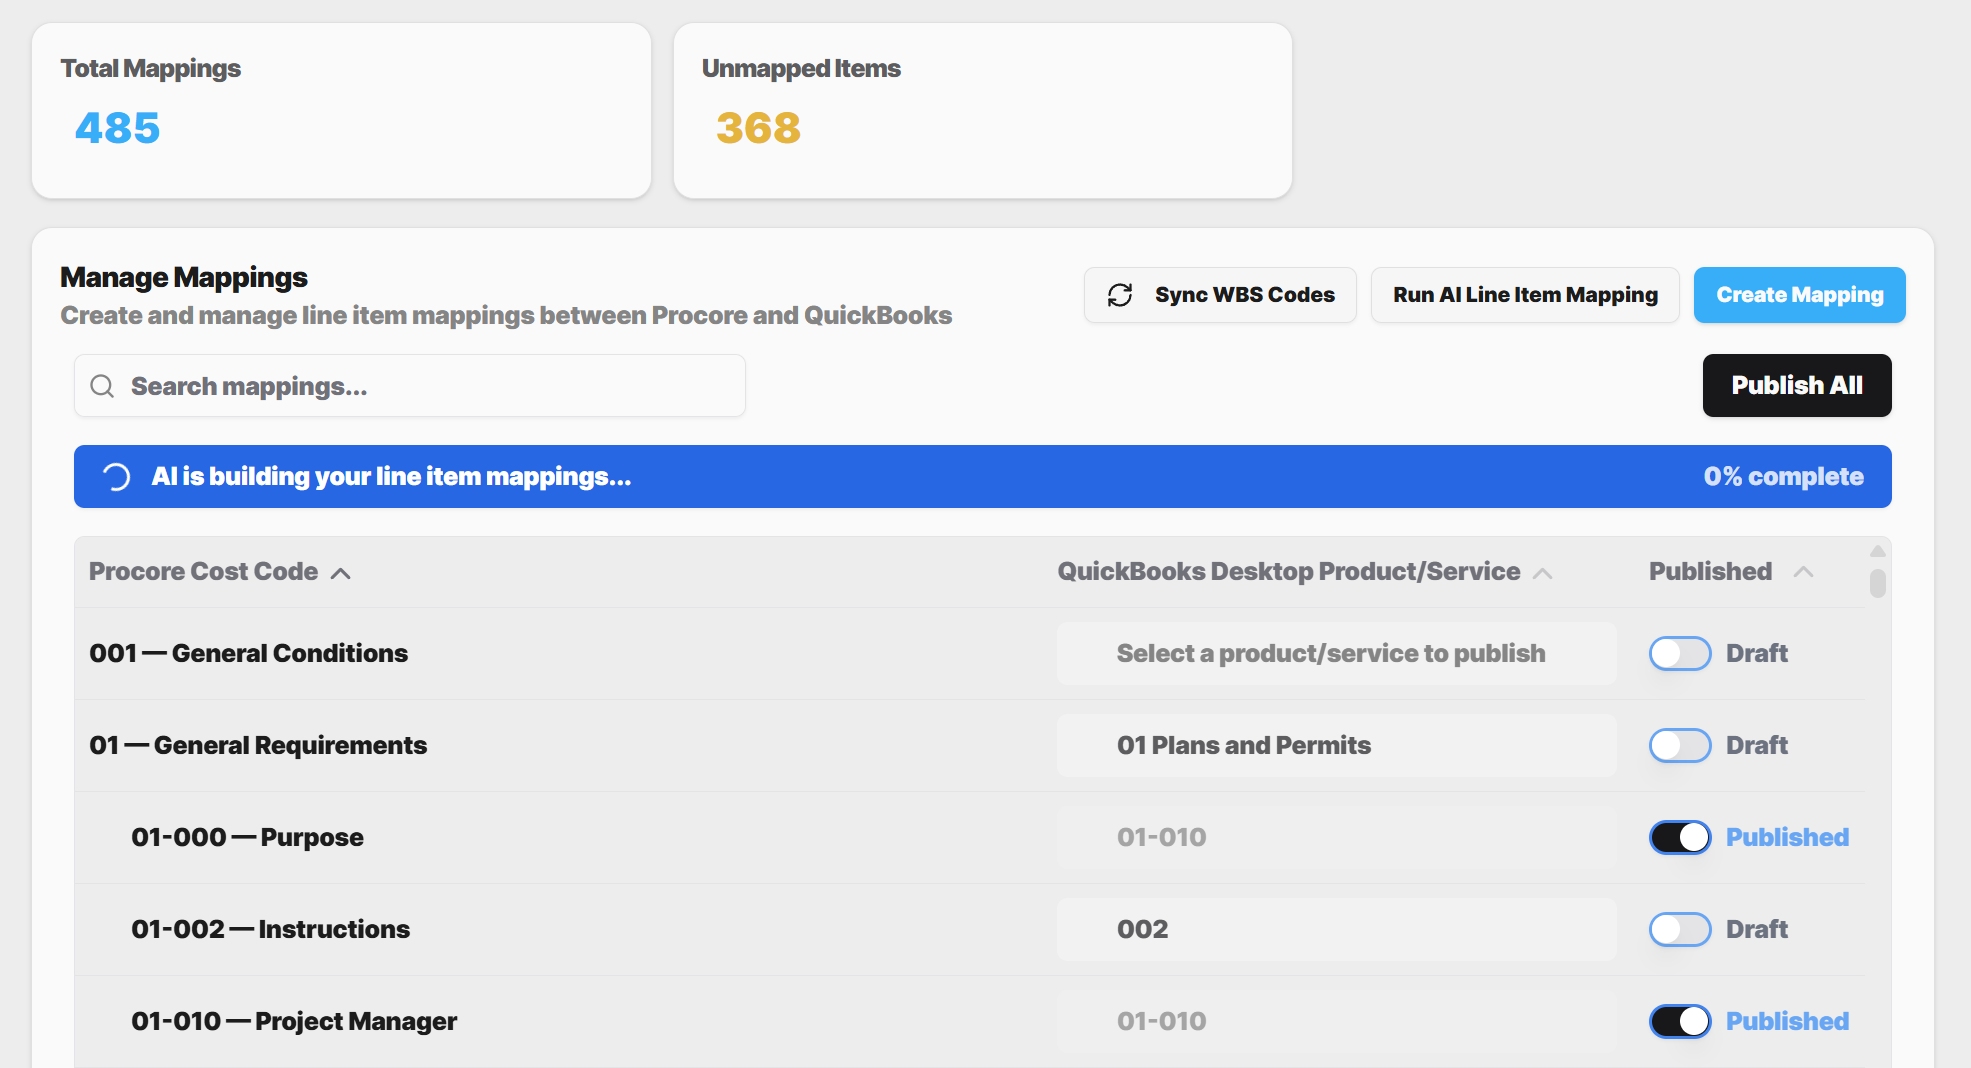
Line item mapping controls how Procore cost codes (and optionally cost types) are translated into QuickBooks line items when bills, invoices, and other transactions sync. The way this mapping works depends on two settings you chose during the Setup Wizard: Line Item Mapping mode and Mapping Granularity.
Line Item Mapping Mode
This setting determines what type of QuickBooks record each Procore line item maps to. You can view the current mode as a read-only badge on the settings page under the Configuration section.
Mode | Description |
Product/Service Mapping | Each Procore line item maps to a QuickBooks Product or Service. Use this if your QuickBooks chart of accounts relies on items to categorize income and expenses. |
Expense Account Mapping | Each Procore line item maps to a QuickBooks Expense Account. Use this if you track costs directly through your chart of accounts rather than through products/services. |
Mapping Granularity
This setting controls how detailed your line item mappings are. You can view the current granularity as a read-only badge on the settings page.
Granularity | Description |
Cost Code | Each unique cost code in Procore is mapped to one QuickBooks record. All cost types within the same cost code share the same mapping. |
Cost Type | Each cost type (e.g., Labor, Material, Subcontractor) is mapped to one QuickBooks record. All cost codes that share the same cost type share the same mapping. |
Cost Code and Cost Type | Each unique combination of cost code and cost type is mapped individually. This provides the most detailed tracking but requires more mappings to maintain. |
Both Line Item Mapping mode and Mapping Granularity are set during the Setup Wizard and displayed as read-only on the settings page. To change these values, you would need to re-run the setup process.
Mapping Line Items
Navigate to the settings page for your integration (QBO or QBD).
Scroll to the Data Mapping Tables section.
Click Line Items.
The mapping table displays a list of Procore cost codes (and/or cost types, depending on your granularity setting) on the left side.
For each row, use the dropdown on the right side to select the corresponding QuickBooks product/service or expense account.
Repeat for all line items you want to map.
For QuickBooks Desktop integrations, if you leave line items unmapped, inBuild will use the Default Invoice Line Item you configured in the settings (if one is set). A yellow warning banner will appear on the settings page indicating how many line items are missing individual mappings.
Project Mapping
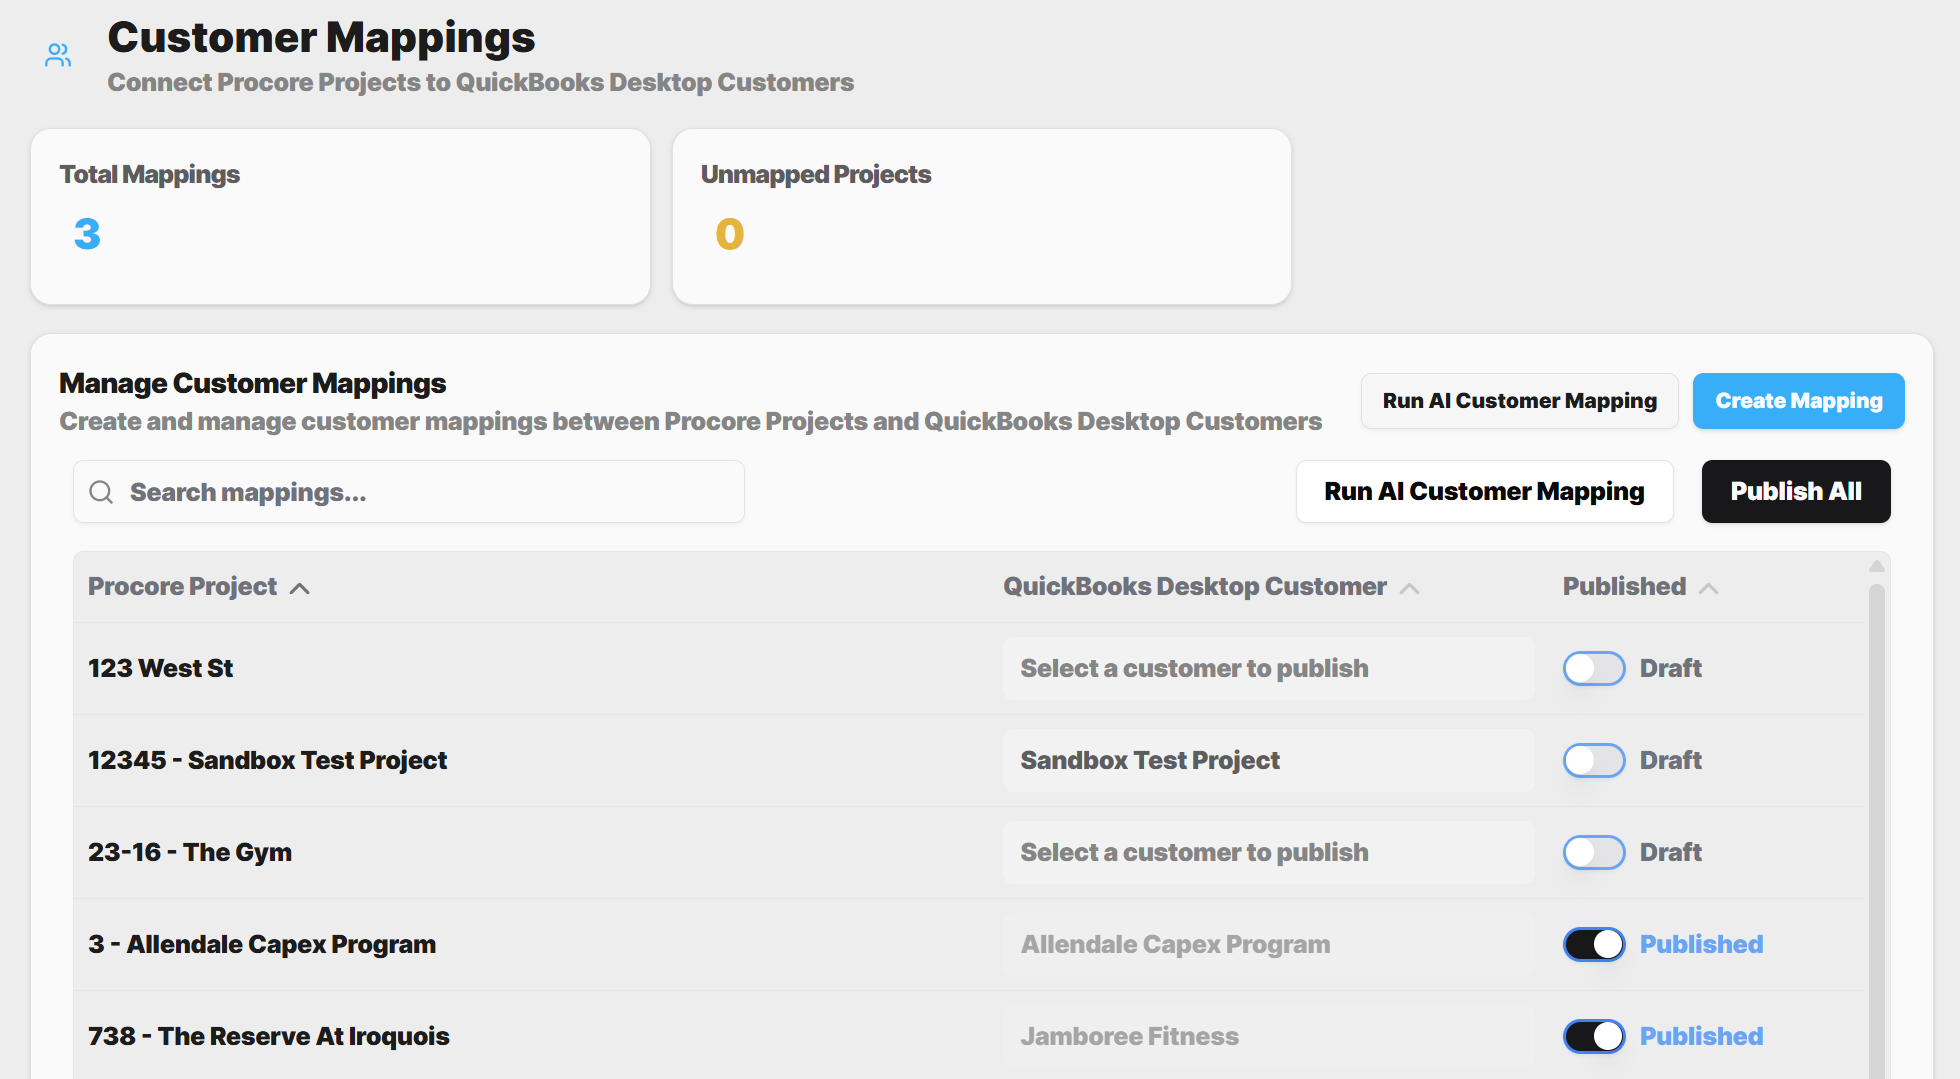
Project mapping links your Procore projects to QuickBooks customers, QuickBooks projects, or both. This ensures that synced bills and invoices are categorized under the correct customer or project in QuickBooks. How this mapping works depends on the Project Strategy you chose during the Setup Wizard.
Project Strategy
You can view the current project strategy as a read-only badge on the settings page under the Configuration section.
Strategy | Description |
Customer | Each Procore project maps to a QuickBooks Customer. Use this if you track each construction project as a separate customer in QuickBooks. |
Project | Each Procore project maps to a QuickBooks Project. Use this if you use QuickBooks' built-in project tracking feature under a parent customer. |
Customer and Project | Each Procore project maps to both a QuickBooks Customer and a QuickBooks Project. Use this if your QuickBooks setup requires both levels of categorization. |
Mapping Projects
Navigate to the settings page for your integration (QBO or QBD).
Scroll to the Data Mapping Tables section.
Click Projects.
The mapping table displays a list of your Procore projects on the left side.
For each project, use the dropdown on the right side to select the corresponding QuickBooks customer or project (depending on your project strategy).
Repeat for all projects that should sync to QuickBooks.
QuickBooks Desktop: Selecting Which Projects to Map
QuickBooks Desktop integrations include an additional setting that controls which Procore projects are available for a given connection. This is found under Map QuickBooks Desktop to Procore Projects on the QBD settings page.
Navigate to the QBD settings page for the integration you want to configure.
Locate the Map QuickBooks Desktop to Procore Projects section.
Choose one of the two options:
Option | Description |
All Procore Projects | Every Procore project in your company is available for mapping to this QuickBooks Desktop connection. This is the default for projects that have not been assigned to a specific integration. |
Select specific Procore projects | Only the projects you select will be mapped to this QuickBooks Desktop connection. A checklist of all Procore projects appears for you to choose from. |
If you chose Select specific Procore projects, check the box next to each project you want to include.
Click Save Settings.
If a project is already mapped to a different QuickBooks Desktop integration, a yellow badge will appear next to it showing which integration it belongs to. Selecting that project will reassign it from the other integration to the current one.
Vendor Mapping
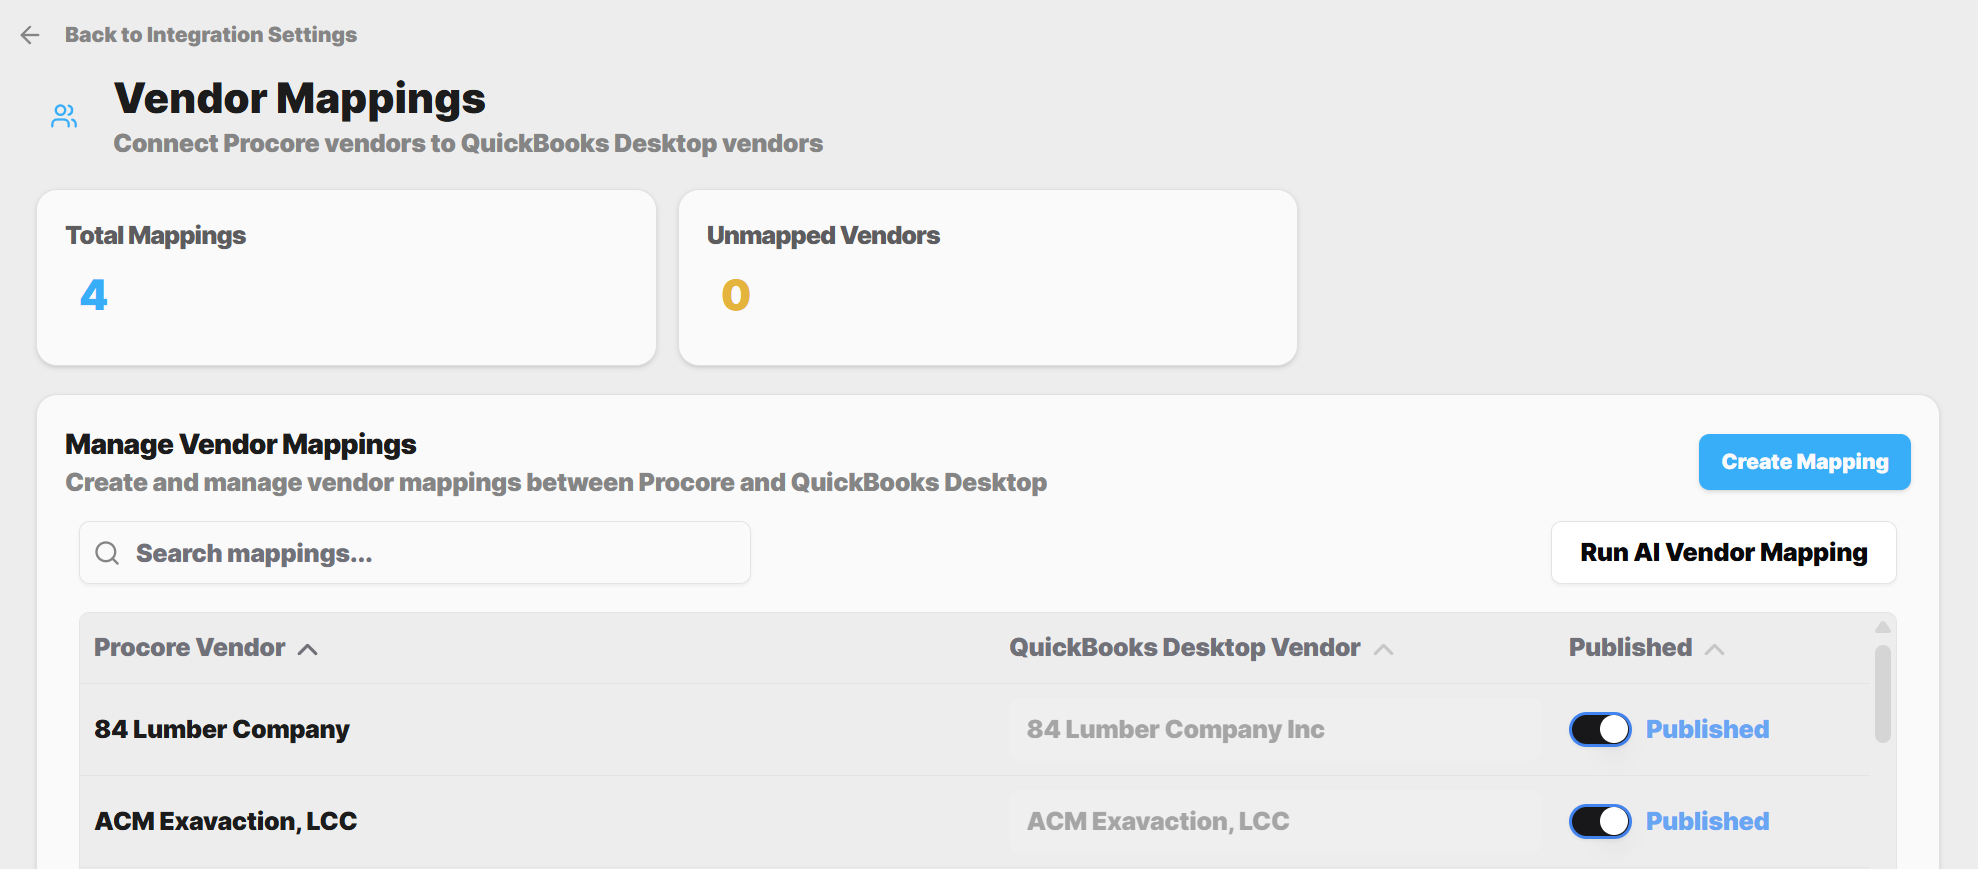
Vendor mapping connects your Procore vendors (subcontractors and suppliers) to the corresponding vendor records in QuickBooks. When a bill or payment syncs, inBuild uses this mapping to assign the transaction to the correct vendor in QuickBooks.
Mapping Vendors
Navigate to the settings page for your integration (QBO or QBD).
Scroll to the Data Mapping Tables section.
Click Vendors.
The mapping table displays a list of your Procore vendors on the left side.
For each vendor, use the dropdown on the right side to select the matching QuickBooks vendor.
Repeat for all vendors that have active commitments or invoices that need to sync.
Keeping Mappings Up to Date
As you add new projects, vendors, or cost codes in Procore, or create new customers, vendors, or items in QuickBooks, you will need to update your mappings. The mapping table dropdowns are populated from cached QuickBooks data. If you have recently added records in QuickBooks and they are not appearing in the dropdowns, sync your QuickBooks data first.
Syncing QuickBooks Data
Navigate to the settings page for your integration.
In the Integration Status section at the top, click Sync QuickBooks Data (or Sync QuickBooks Desktop Data for QBD).
Wait for the sync to complete. A loading spinner will appear while the data is being refreshed.
Once the sync finishes, return to the mapping table. The dropdowns will now include any new records from QuickBooks.
The Last Sync timestamp in the Integration Status section shows when QuickBooks data was last refreshed. If it says "Never," you should run a sync before configuring your mappings.
Frequently Asked Questions
Why don't I see the Data Mapping Tables section on my settings page?
The mapping tables only become available after you complete the Setup Wizard. If you see a message that says "Configuration Required," click Start Setup Wizard in the Configuration section to complete the initial setup. Once the wizard is finished, the mapping table links will appear at the bottom of the page.
I added a new vendor/customer/item in QuickBooks, but it does not appear in the mapping dropdown. What should I do?
The mapping dropdowns are populated from cached QuickBooks data. Click Sync QuickBooks Data (or Sync QuickBooks Desktop Data) in the Integration Status section at the top of the settings page. After the sync completes, the new record should appear in the dropdown.
Can I change the Line Item Mapping mode or Mapping Granularity after the initial setup?
These settings are configured during the Setup Wizard and are displayed as read-only badges on the settings page. To change them, you would need to re-run the setup process.
What happens if I leave a line item unmapped?
For QuickBooks Desktop integrations, unmapped line items will use the Default Invoice Line Item if one is configured in the settings. A yellow warning banner on the settings page will indicate how many line items are missing individual mappings. For QuickBooks Online, each line item should be mapped individually to ensure transactions sync correctly.
Do I need to map every vendor and project, or only the ones that will sync?
You only need to map vendors and projects that have transactions you expect to sync to QuickBooks. However, it is a good practice to map all active vendors and projects to avoid sync errors when new invoices or bills come through.